

I’m not a gunsmith, so after I determined to create my very own AR-15 construct package I knew there can be a studying curve and, presumably, some flying springs.
The truth is, that’s what occurred the primary time I attempted a DIY Milspec set off meeting. I ordered the set off parts from Bushmaster, again when Bushmaster was nonetheless in Windham, Maine and earlier than it was purchased out by Remington. (The unique Bushmaster staff later based Windham Weaponry). With out the proper instruments for the job, no expertise, and nobody aside from a guide to information me – *SPROING* went one of many springs.
I ultimately discovered it after scouring the ground – bent past restore.
I referred to as Bushmaster, advised them of my woes, and ordered a number of alternative springs. The gross sales rep, upon listening to my mailing deal with, stated he lived close by and he might simply meet me that weekend to do it for me. I let him assemble your complete fireplace management group and I by no means messed with it once more.
About 20 years later I used to be prepared to present it one other try, albeit guided by my buddy and fellow SHTF Weblog author, Drew Forge, who has way more expertise with the center of an AR-15 than I do. He assisted writing this text, so there could be a number of writing voices and factors of view throughout the article.
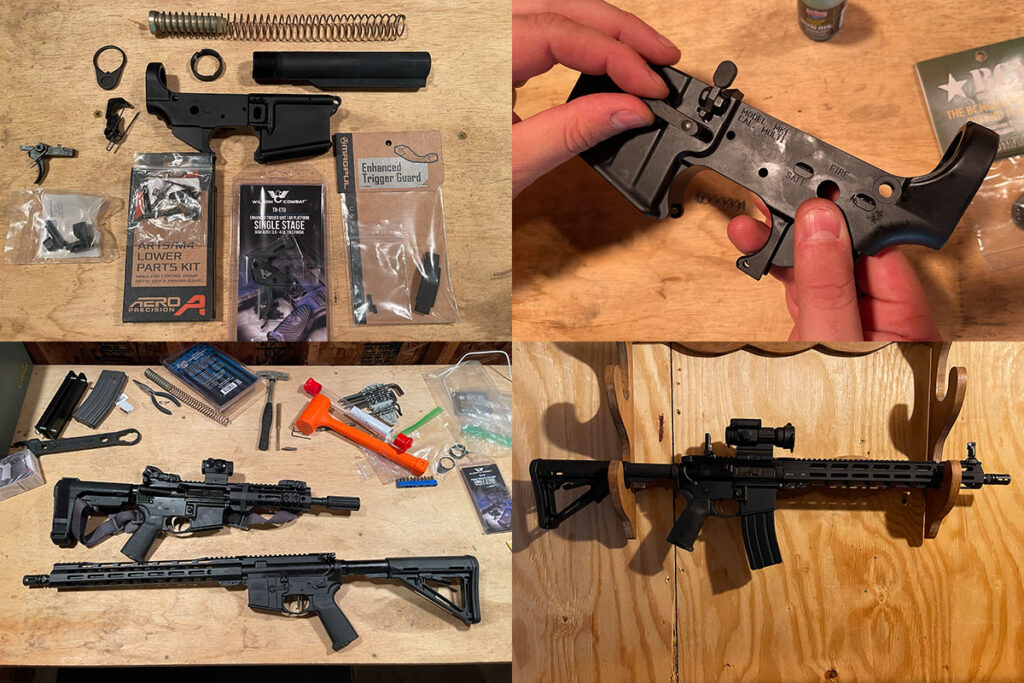
Why a DIY AR-15 Construct Equipment
I’ve shot sufficient completely different AR-15s through the years that I wished one thing that I might actually name my very own, one thing that was constructed to my specs from buttstock to flash hider. There are many off-the-shelf AR-15s obtainable for buy with all kinds of configurations, however I wished my very own.
Some great benefits of placing collectively my very own AR-15 construct package appeared clear:
- I might get the precise AR-15 configuration I wished.
- I might lower your expenses by shopping for solely the items I wished, not having to spend additional to swap out parts for elements I wished to improve.
- I might study a bit alongside the best way by “constructing” the AR myself.
There are numerous AR construct kits obtainable available on the market for the aspiring AR gunsmith, however the issue I discovered is that they’re nonetheless “customary” builds. I used to be not focused on shopping for a construct package that solely included a set assortment of parts. I wished to choose my very own elements, and construct an AR with these. That is what I imply by a “DIY” construct package.
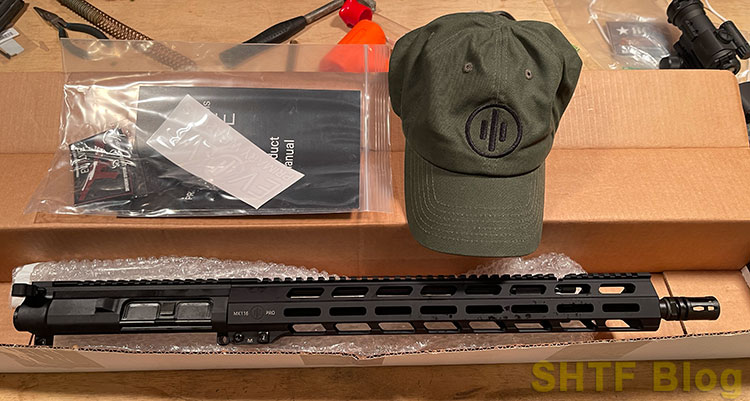
Recognizing my gunsmithing limitations, I additionally wished to be life like about how deep right into a construct I used to be keen to go. I wished one thing manageable for a primary construct. My center floor on this DIY construct was deciding to construct the decrease receiver myself and shopping for an assembled higher meeting. This choice was made simpler by the actual fact I discovered a whole higher meeting that was configured precisely how I wished, the Main Weapons Programs MK116 PRO. I wished a higher-end construct and it made sense to splurge for my dream higher. This was it.
You don’t want to purchase or construct an higher as fancy as this one in your DIY AR-15 construct package, so we’ll stroll you thru decisions to be sure to are choosing and selecting the elements that create the rifle you want.
Why Optics Planet
There are numerous on-line and brick and mortar shops the place you should buy full ARs and AR-15 elements. It wouldn’t take a lot to purchase every a part of an AR from a special retailer, or completely different producer for that matter. For ease of buying, I went with a retailer that I’ve used loads of occasions earlier than – Optics Planet.
With a number of exceptions, talked about under, I used their website to purchase all the pieces on this construct. The costs have been aggressive and all the pieces got here collectively directly (besides after I realized I missed a number of items and wanted to put a second order). In addition to that, we’d carried out a construct with Palmetto State Armory earlier than and it was time to vary it up.
Optics Planet doesn’t make their very own model of firearms like PSA, which allowed me to simply decide between completely different producers to assemble the entire items I wished from one on-line retailer.
Straightforward!
Obligatory Instruments
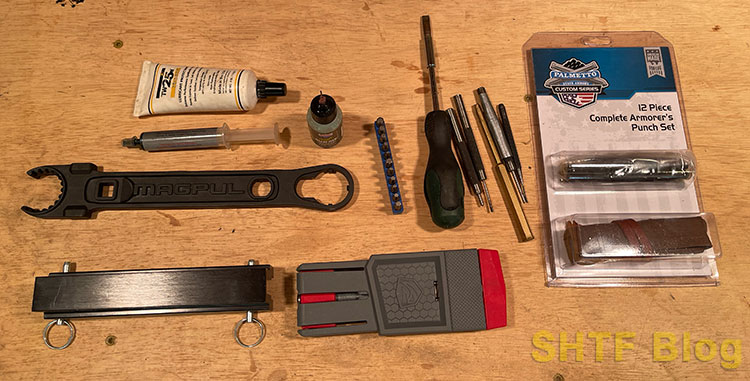
- Rubber mallet and Ball Peen Hammer
- Magpul Armorer’s Wrench (a Godsend when assembling ARs) or related device
- A set of Allen wrenches – 3/16″ for attaching the grip, 1/8″ and 1/16″ for numerous equipment)
- A devoted set of punches – search for a set with roll pin starter punches, it’ll pay for itself very quickly by means of lack of frustration and scratches in your receivers! This Wheeler set is great.
- Brass Drift
- Journal nicely decrease Vice Block just like the proven Actual Avid Decrease Vice Block
- Higher receiver Vice Block – glorious for altering muzzle units, fuel tubes, and handguards, even in case you order absolutely assembled higher receivers
- Grease and oil – I like Miltech TW-25B and Ballistol or Hoppes Elite, however there are tons of nice choices on the market!
- A torque wrench that measures in ft-lbs – used for fortress and barrel nuts and muzzle units
- Masking tape or enterprise playing cards to protect your receivers when driving roll pins (particularly the bolt launch pin)
- Not proven, however HIGHLY advisable: Entrance pivot pin detent meeting device
Higher Receiver Meeting Programs
There are such a lot of nice choices already obtainable, one thing to suit nearly each want and use. That is what I discovered, so assembling an higher wasn’t totally essential. When buying in your AR – particularly in case you’re going part by part, listed here are some issues to think about.
Barrel Specs
Lengths
Barrels are a deep, deep rabbit gap to get into. We’re specializing in the 5.56/.223/.223 Wylde caliber for this construct. Nevertheless, relying on whether or not you need to construct an AR pistol, customary carbine, Authorities mannequin/A2 AR, or a precision rifle, you may get barrels in lengths beginning at a crowd-pleasing fireball-inducing 5 inches(!) all the best way out to 24 inches for the goal and varmint sample barrels.
Most AR carbine builds nowadays have barrels within the 14.5 inch to 16 inch vary. Keep in mind, in case you get a 14.5 inch lengthy barrel you might want to get a muzzle system that’s a minimum of 1.5 inches lengthy so it makes the whole barrel meeting 16″ or longer. Your muzzle system have to be pinned and welded as nicely to adjust to ATF tips.
Twist Charges
Many individuals needlessly complicate the speed of twist debate for a 5.56 AR. Frequent charges of twist (ROT) are 1:7, 1:8, and 1:9. Some older rifles and fashionable light-bullet varmint builds could be noticed with 1:10 or 1:12 ROTs; 99% of the individuals constructing ARs (together with me) will do very nicely with the 1:8 charge of twist. It’s a fantastic all-around compromise, taking pictures 55 grain and 62 grain army surplus ammo nicely, in addition to heavier 69 and 75+ grain tactical or precision masses.
When you’re taking pictures the lighter 55 and 62 grain bullets completely, there’s nothing flawed with a 1:9 ROT barrel – however you might thoughts accuracy missing in case you determine to run heavy bullets masses by means of your gun. The converse is true for 1:7 twist barrels – the sooner charge of twist (1 revolution in 7 inches) will stabilize longer, heavier bullets – however might over-stabilize lighter projectiles and trigger accuracy points with 55s and 62s.
Lengthy story quick: know the ammo you’ll be utilizing and get the right ROT in case you’re chasing the perfect accuracy you possibly can wring out of your rifle. That being stated, virtually all fashionable AR-15s in 5.56/.223 Wylde are working 1:8 or 1:7 twist barrels. When you don’t need to overcomplicate issues, get a 1:8 and don’t look again – that’s what I did with this construct; my .223 Wylde barrel sports activities a 1:8 twist for versatility.
Profiles
Barrel profiles are a balancing act: weight vs. rigidity vs. warmth dissipation. A thin, light-weight barrel will probably be a pleasure to hold and deal with, however it would warmth up very quickly and has the potential for teams to open up or endure zero wander. A heavier, longer barrel gives elevated rigidity and bigger floor space for cooling, however they’re typically oppressively heavy.
Each barrel profile was designed with a goal; put some thoughts science into what you need your AR for use for and purchase appropriately. M4-pattern barrels appear to supply a superb compromise in weight and rigidity; (plus a stepped notch to mount your M203 – har har!) it’s a superb place to start out your search.
Gasoline System
There are two major varieties of fuel techniques that make an AR perform: the traditional (and customary) Direct Impingement (DI) fuel system, and the fuel piston pushed system. There are one million phrases already written on DI vs Piston AR working system, so we’ll distill the widely accepted professionals and cons of every down.
Direct Impingement techniques are frequent, light-weight, cheap, comparatively extra correct as a consequence of much less transferring elements placing strains on the barrel and twiddling with its harmonics, and so they usually generate much less felt recoil as a consequence of decrease mass of reciprocating elements. Nevertheless, DI weapons are likely to get dirtier rather more rapidly, they’re tougher to regulate the gassing charge (necessary for you suppressor guys) and could be liable to fuel port erosion over the course of many rounds.
Gasoline Piston weapons are thought of to be extra dependable and fewer ammo-sensitive than DI weapons, and so they run cooler and far cleaner than DI, since there’s a bodily working rod doing the operation work of the rifle, as a substitute of scorching gasses. However the downsides of Gasoline Piston ARs are elevated price, decrease likelihood of alternative elements compatibility submit SHTF, and elevated felt recoil.
I made a decision to run a PWI fuel piston system on this AR for elevated reliability and since I wished a construct that was higher-end.
Bolt Meeting
There are various opinions on what includes the perfect bolt for an AR system. In case your rifle didn’t include a bolt and you might want to supply one from the aftermarket, all the time purchase the perfect bolt you possibly can afford; it’s the lifetime of your rifle and due to this fact, by the transitive property, presumably the lifetime of you when the balloon goes up.
Our PWI higher receiver was a fuel piston working system, and it runs on a proprietary PWI two-piece bolt-and-operating-rod system – so we didn’t have a lot alternative right here. We have to run this explicit bolt.
Nevertheless, in case you’re working a DI gun, the fabric, end, and design decisions are staggering. I prefer to run a “full auto” bolt for the little bit of additional weight and probably higher biking; coincidentally, most bolts you’ll supply nowadays are standardized within the full auto configuration (it’s not unlawful to personal a “full auto” bolt, FYI). Shot-peened and stress examined or magnetic particle inspected bolts are definitely worth the few additional bucks to make sure your bolt’s materials is freed from stress fracture factors or different points. Excessive-lubricity coatings that cut back friction and put on aren’t a horrible thought both.
No matter you find yourself buying, ALWAYS verify to make sure the fuel secret is correctly mounted on the bolt (you shouldn’t have the ability to see even the faintest sliver of daylight between the important thing and service) and that the important thing’s mounting screws are securely staked. Additionally, popping the extractor out of the bolt itself and ensuring the spring has the “additional energy” rubber O-ring round it’s glorious insurance coverage to maintain your extractor working reliably.

Keep in mind, AR’s usually like working “moist” or well-lubed. Be sure you juice that bolt up earlier than you assemble it into the rifle!
Charging Deal with
There are three basic varieties of customary charging handles you’ll see on ARs (we’re excluding the funky side-charging handles): customary or mil-spec, prolonged latch, and ambidextrous. The usual charging deal with is easy and works okay, however doesn’t give you a lot elevated leverage to function the gun beneath less-than-optimal situations, and you might want to wrap each fingers on the charging deal with to cost the gun.
Prolonged Latch charging handles take the small latch supplied on customary charging handles however substitute it with a bigger system that initiatives out barely additional on the left facet of the rifle. This gives far superior leverage and functionality to run the gun by permitting the operator to maintain his firing hand in place, however use the help hand to extra simply cost the rifle or clear malfunctions, even with the rifle on or close to the shoulder.
Ambidextrous charging handles supply the identical advantages because the prolonged latch system, however supply latches on either side of the charging deal with, growing the flexibility and performance of the rifle for southpaws or maybe injured operators.
Handguard
The handguard(s) on an AR are presumably essentially the most mission necessary a part of the construct; the times of these out of date two-piece ribbed A2-style handguards are OVER – let’s step into the twenty first century with a contemporary setup, lets?
The handguard gives a mounting level for many of your equipment – entrance sight, sling, lights, fore grips, bipods, lasers…the checklist goes on. You’ll run into two varieties of handguards usually; the free-float system, and the two-piece drop-in sorts that you just’ll use after you throw your ribbed-for-nobody’s-pleasure A2 handguards within the forgotten elements bin.
The drop-in sorts are dominated by the Magpul MOE lineup, and for good purpose. These powerful, nicely thought out, modular handguards are efficient, cheap for what they provide, present a number of factors for the universe of MLOK attachments, and so they come it numerous spiffy colours. The drop-in techniques clamshell over the barrel in two halves, and make the most of the Delta ring in entrance of the receiver to clamp the halves in place.
You order yours for the size of your barrel/fuel system (carbine/mid-length/rifle) and go from there. For utter simplicity, modularity, and pockets friendliness, you possibly can’t beat the Magpul MOE. Actually.
Free-float handguards (so named as a result of they connect on the rear and float freely over the barrel with out touching it) are available a dizzying array of designs, supplies, lengths, and attachment factors/strategies; too many to enter intimately right here. Go for the one you want (and may afford) that gives the tip outcomes you want. Right here is tips on how to set up one.
Fairly customary for a 16″ carbine is a 13 or 15″ rail setup; we now have the latter size on our PWI higher. The place this rifle is a piston gun and has a slot to regulate the fuel port, we have been completely happy that the handguard the higher got here with match our wants, being 15″ lengthy and MLOK suitable.
About that “MLOK” – you’ll run into three customary varieties of mounting techniques (a number of corporations like Troy have some outliers however you don’t see them too usually): Keymod, MLOK, and integral picatinny rails. MLOK is usually changing into the business customary attachment system , although the opposite two techniques work simply high-quality. No matter you get, make it possible for any equipment you boy are acceptable in your handguard’s attachment technique.
Optics
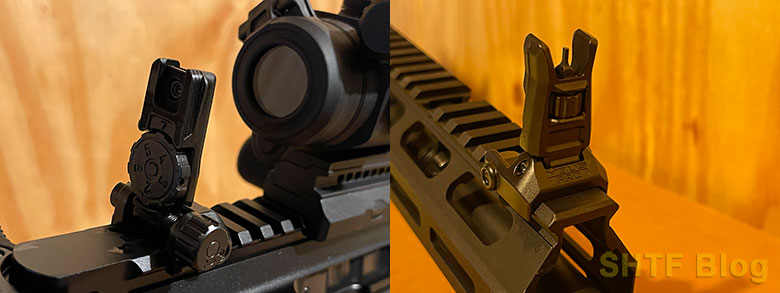
Ahh, optics. The good versatility of the AR platform is accentuated by the top-mounted picatinny rail system included on virtually all fashionable AR platform rifles and pistols. Realizing tips on how to use iron sights (and shopping for high quality back-up irons just like the Magpul MBUS PRO sights you’ll see on a number of of the pictured rifles on this article) ought to all the time be step on on studying tips on how to use a rifle successfully – however a high quality optic is definitely a power multiplier that may improve your abilities and make sighting sooner and extra exact.
Optics are available a number of customary flavors – we’ll cowl the three hottest.
Purple Dots
Purple dot and reflex kind sights mission a small crimson dot onto a lens that may be a quite simple aiming level. There are not any eye reduction points, that means you possibly can put the optic as near or as far out of your eyes as you would like. They do run on batteries, however fashionable crimson dots – particularly these from Swedish firm Aimpoint – supply years of battery life from a single battery.
Rheostats on the optic physique enable the person to regulate dot brightness to compensate for ambient gentle situations. Purple dots are historically non-magnified, and their dots cowl up a portion of your goal that will increase the additional away your goal is. For that reason, crimson dots often aren’t the selection for long-range precision work, however are as a substitute very good decisions for quick, close-in work.
Holographic Sights
Holographic sights like the ever-present Eotech household of optics, or the Vortex AMG UH-1 work through the use of a laser diode and a sequence of reflectors contained in the housing of the optic to create a reticle within the viewing port of the sight, very similar to a heads-up show on a contemporary fighter jet. Due to this method, the holographic sight has no parallax points and the reticle is all the time proven in the midst of the optic’s huge subject of view.
Like crimson dots, holographic sights are extremely fast to make use of and may supply a number of aiming factors within the reticle – Vortex’s glorious USB rechargeable AMG UH-1 holographic sight gives a circle-and-dot reticle, together with a triangle within the 6 o’clock area of the reticle that gives a secondary aiming level that takes into consideration the offset within the sights and bore axis on ARs for up-close-and private work.
Nevertheless, holographic sights could be thirsty and there’s a risk chew by means of batteries regularly; whereas a superb crimson dot sight can supply 50,000 hours of continuous-on, a holographic sight may supply one hundredth of that battery life. It’s an enormous distinction to think about when stockpiling batteries for post-SHTF caches.
A facet word whereas we’re contemplating optics for SHTF ARs: crimson dots and holographic sights have batteries and circuitry that may doubtless be inclined to break in an EMP occasion. When you’re on the lookout for an improve over iron sights that may be EMP proof, learn on!
Magnified Optics
LVPO (Low Energy Variable Optics) sights are extremely standard on AR platforms, as they provide exact aiming reticles, they don’t require batteries, and with a fast rotation of a collar on the physique of the scope, you possibly can change the magnification degree seen by means of the optic. Most LVPOs you’ll run into are usually within the 1x-4x (that means it may well enlarge the sphere of view within the optic from 1x, or no magnification, to 4x, 4 occasions the magnification) or 1x-6x vary, with some outliers on the market that go greater. Precision AR-15 builds can run optics at 20x magnification and past, relying in your wants and checking account enthusiasm.
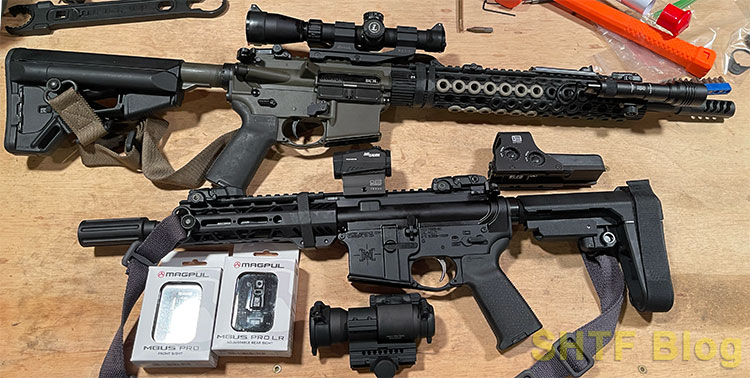
The inexperienced AR within the image above sports activities an older Leupold MK AR MOD 1 on a Burris PEPR mount- a wonderful, top quality setup that has stood as much as many vary classes, coyote hunts, and coaching programs. The low energy 1.5x-4x magnification is straightforward to make use of in shut quarters conditions at its lowest setting, however the highest 4x magnification is beneficial for partaking targets at 200 yards and past even. This one has a 1″ diameter tube, but when I used to be doing it over I’d in all probability search for a 30mm tube LVPO for extra gentle transmission into the optic.
Many corporations make dynamite LVPOs – Leupold, Vortex, Trijicon, SIG Sauer, Burris, and others – simply remember to plunk some critical cash down on a top quality model identify optic and a top quality mount – an inexpensive scope will completely destroy your day as quickly as you let it.
An attention-grabbing hybrid to notice is Leupold’s “Firedot” scopes (there are in all probability different producers that supply related merchandise, however to be sincere, I don’t stray too removed from Leupold) – sure, they’re battery powered, however they mix the usefulness of a LVPO with a crimson dot, transposing a glowing dot on the middle on the optic.
You possibly can flip the dot off to preserve battery life and use the optic as a daily magnified scope, or you possibly can flip the dot on to benefit from the quick close-in reference of a dot sight. When the battery dies, you continue to have the utility of the usual reticle besides – one other factor to think about for a SHTF state of affairs.
Decrease Receiver Meeting Programs
Buffer and Receiver Extension/Buffer Tube
The buffer and spring that trip inside the receiver extension (generally referred to as the “buffer tube”) ought to be matched to your caliber, fuel system size, and supposed use; an ordinary 5.56 mid-length fuel system will often want a special buffer weight than, say, a suppressed .300 Blackout pistol.
For this construct, an H2 buffer weight was utilized as it’s a fairly customary weight for a mid-length AR carbine; the PWI higher has an adjustable fuel block so we will dial the system in as wanted in case the buffer weight is a bit off and recoil is excessive or the rifle doesn’t perform correctly or if we wanna run with a can. These of you constructing DI weapons would doubtless should fiddle with buffer weights as an introductory step in case you’re working into biking points.
Hearth Management Group
The Hearth Management Group (or FCG) is comprised of a number of customary elements on an AR-15: the hammer, the set off, the disconnector, the disconnector spring, the hammer spring, set off spring, and the 2 pins that maintain the entire works within the receiver. You possibly can go one among two methods: a “DIY” mil-spec FCG meeting the place you should assemble all of the elements contained in the receiver, or a one-unit drop-in set off meeting that is a little more refined and simpler to put in.
In case your Decrease Parks Equipment doesn’t include an FCG, you have got extra homework to do and one other buy to make.
Mil-Spec DIY FCG Meeting
You possibly can, with relative ease and some additional springs simply in case, assemble a fundamental set off meeting from bought elements. We’ll get into the set up strategies shortly, however let’s look into why you may purchase a mil-spec FGC over a often superior drop-in set off in your AR platform rifle.
First off: Price. drop in setup can run into the lots of of {dollars}; a decent-quality FCG from, say, Aero Precision may run you $50.00 and supply a purposeful set off pull. Nevertheless, you should buy an excellent dear high-end FCG just like the Geiselle SSA-E for over $200.
Elements compatibility and performance down the highway or submit SHTF is one other side to have a look at when deciding on an FCG kind. A drop in set off will doubtless be comprised of a principally sealed unit stuffed stuffed with proprietary elements; a mil-spec set off meeting is simply that: standardized elements constructed to a specification.
If you might want to repair a damaged or worn FCG half in your AR, an area gun store is sort of definitely going to have mil-spec elements on the shelf for affordable; not a lot in your tremendous drop-in set off. Additionally, after the balloon goes up and it’s important to scab elements to maintain the one you love customized constructed rifle working, mil-spec elements are going to be much more available in idea.
Customization is one thing to recollect as nicely; keep in mind, you are able to do your personal set off job on a budget in case you’re engaged on a low-budget construct. Simply keep in mind: an inexpensive FCG, whereas totally purposeful, will internet you a gritty, heavy set off pull that may impede high-quality accuracy. Spending a number of additional bucks on a reputation model FCG gives you a far superior set off pull from the beginning.
Drop In Set off Meeting
The drop-in set off meeting is straightforward to put in. It, fairly actually, simply drops in. Drop it into the Hearth Management Group cavity on the decrease receiver, and align the holes to set the set off and hammer pins. Run a drop of oil on the pins, press or faucet the pins calmly in with a mallet. It’s about as straightforward an improve because it will get within the AR-15 world!

We used a Wilson Fight Tactical Equipment single stage set off and it’s completely SUPERB, with a crisp 4 lb. set off pull. Many different corporations like CMC and Timney make excellent adjustable drop-in set off units, however this Wilson Fight unit is among the many finest we’ve personally tried.
Grip
A grip is a completely private choice, based mostly on materials, texture, contours, and storage capability. I’ve just lately been turned onto the TANDEMKROSS Hive Grip and I really like them, however for most individuals, the primary and closing phrase is Magpul. The MOE grip is the usual towards which all others are judged, and with glorious ergonomics, swappable storage items, and some completely different configurations, it’s not laborious to know why.
We took a ballot right here at SHTFblog, and we just like the rubberized MOE-Plus Grip finest. Don’t put these outdated skinny A2 grips in your SHTF AR; yeah they’re nostalgic however they simply form of… suck functionally. Until you don’t like storage and also you take pleasure in getting your fingers roughed up by the underside of the receiver’s set off guard ears – you do you.
Inventory
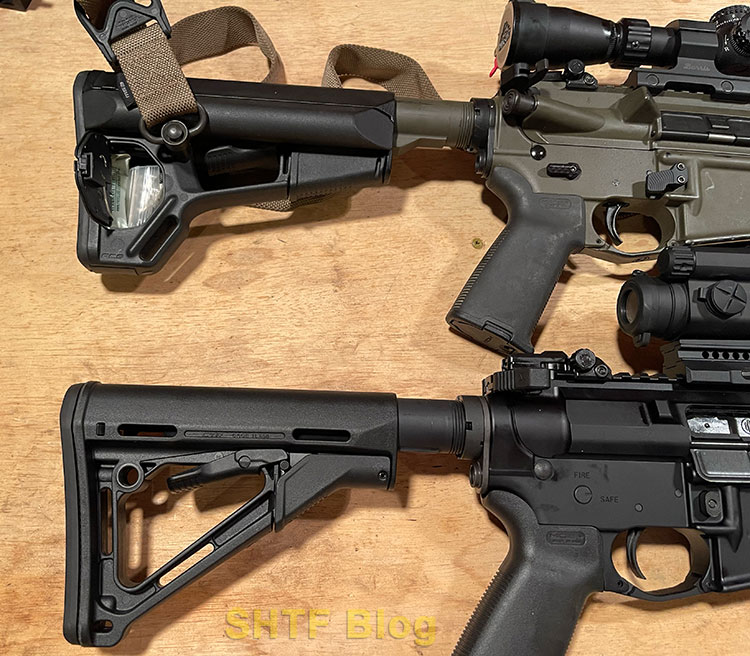
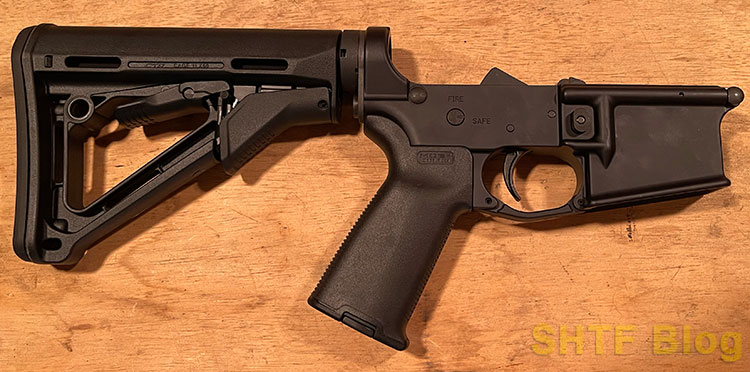
The pièce de résistance in your AR decrease is the inventory. Merely changed, the inventory is likely one of the first upgrades AR house owners make over the outdated M4 type collapsible inventory – a design that dates again with only a few adjustments to the CAR-15 of the Vietnam period! There are many killer choices on the market (like the rest within the AR world) however the Magpul CTR inventory is the place you must begin your search. Easy, rigged, light-weight, and with a number of sling attachment choices (together with integral QD sling ports), the CTR is a good first cease in your method to AR greatness.
Within the image under, the higher AR-15 has a Magpul ACS inventory, replete with facet storage compartments for batteries that double as cheekwelds, and an additional storage compartment within the butt itself. Whereas heavier and never low-cost ($90.20 at Optics Planet on the time of this writing), the ACS is an outstanding device to intensify a self-sufficient out-the-door AR-15 – load it up with spare elements and a small punch and a few CR-123 batteries, and your AR is able to go!
Nevertheless, for our topic construct AR, we elected to run the cleaner, much less obtrusive Magpul CTR inventory. Make certain you verify your buffer tube for milspec versus business when ordering! Be sure to purchase the proper inventory in your buffer tube; although Milspec is now business customary, producers nonetheless supply business buffer tubes and shares.
Assembling Your Decrease Receiver
Useful Trace: Maintain all items collectively and arranged. After pulling kits out of their delivery baggage so we might get an correct piece rely, we set all small elements in a Ziploc bag whereas working so they may not get misplaced earlier than they have been put in.
There are a bazillion books and YouTube movies on the market, however we like Optics Planet’s glorious AR-15 How-To Meeting sequence, which you’ll find right here. We’ll contact on the steps however for a extra in-depth video, we positively suggest the Optics Planet web page.
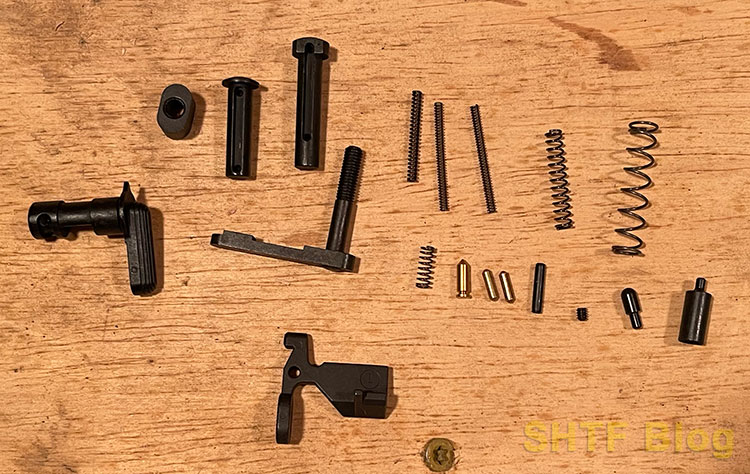
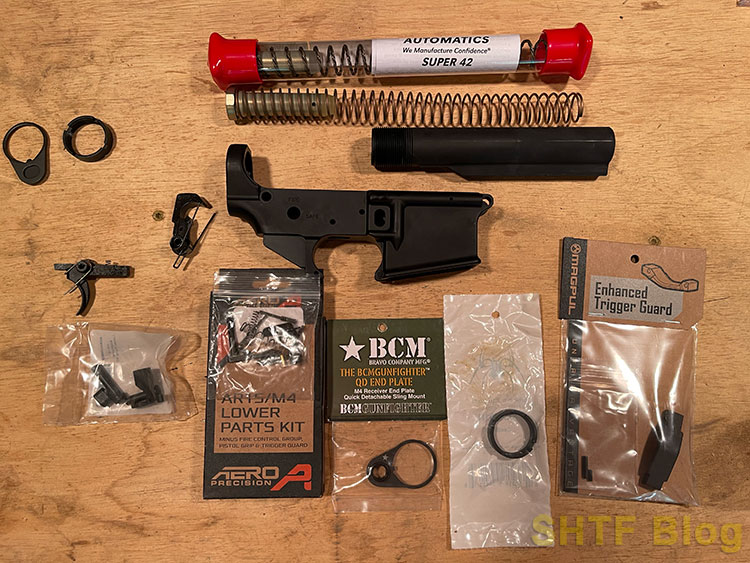
Elements wanted: Base Decrease Elements Equipment, Further Decrease Elements Equipment, Set off, and Set off Guard. These elements could be bought in several packages or all-in-one Decrease Parks Kits, or LPKs. Please word that some producers supply LPKs with and with out the Hearth Management Group (FCG), which comprise the hammer, set off, disconnector, and related springs
Professional tip: if that is your first time assembling an AR stripped decrease, do your self a favor and order a number of additional detents and comes. You’ll want them after you ship a pair into decrease Earth orbit. Even in case you acquired the pivot pin meeting device, the additional detents and comes are extremely advisable.
Stripped Decrease Meeting Steps
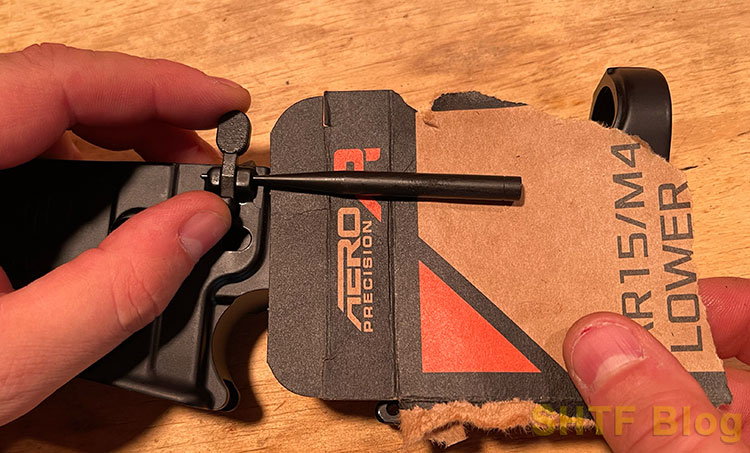
1) To assemble the bolt catch, first drop within the spring, then the plunger into the recess on the left facet of the receiver. I’ll often set a drop of oil on the rounded dome of the plunger.
2) Insert plunger roll pin (proper to left), and utilizing a chunk of cardboard to guard the receiver, and use a mallet and nail punch (brass is most well-liked because it’s softer and fewer prone to mark the receiver) to gently faucet it in. I’ll often begin the roll pin earlier than placing the bolt catch in its slot so I’m not juggling holding a bunch of elements aligned – however watch out to not drive the roll pin so par that it protrudes into the bolt catch slot!
As soon as the roll pin is began and secure, insert the bolt catch, press it towards the plunger spring stress, and drive the roll pin residence, taking care to make sure it goes by means of the pin gap on the bolt catch. Seat the roll pin flush.
3) Insert the journal launch into the left facet of the receiver, and drop the journal launch spring (it’s the biggest spring within the LPK) onto the other finish across the threaded shaft of journal launch; once more, I prefer to put a drop of oil on the threads.
4) Set your journal launch button on the threaded shaft, press down and spin it on. Will probably be beneath spring stress. You’ll attain a degree the place the journal launch button can’t be screwed on any additional; at this level, align the button’s orientation with the opening on the proper facet of the receiver, push the button as deep into the receiver as you possibly can. and the journal catch will protrude out the opposite facet. Pull the catch away from the receiver and switch it clockwise till the threaded shaft protrudes into the button and sits just under flush on the floor of the magazine launch button. Take care to not scratch your receiver as you flip! Take a look at it with an unloaded journal to ensure it seats and releases correctly.
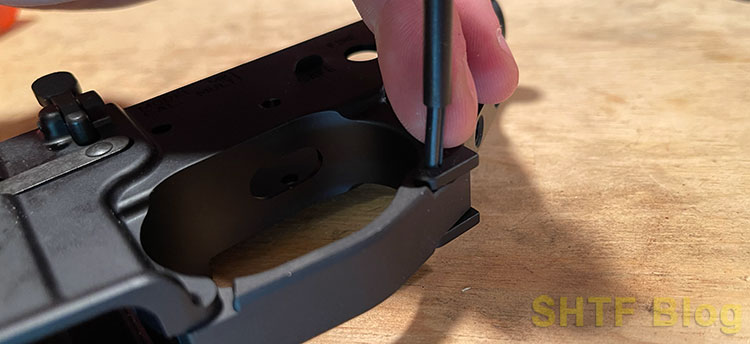
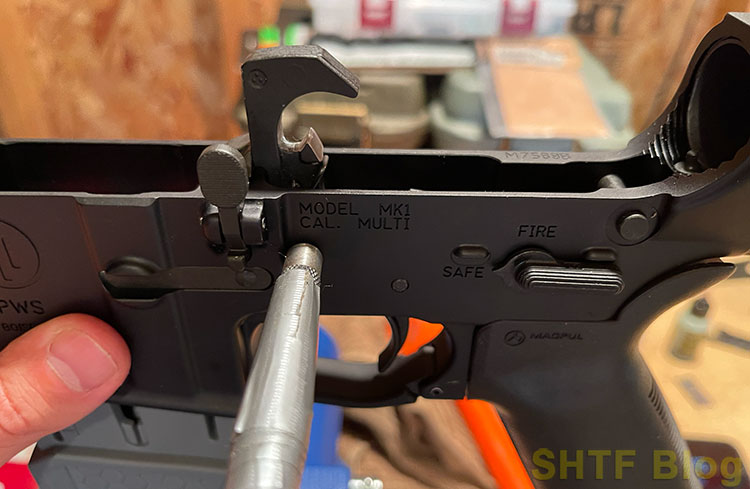
5) Insert your set off guard within the right path (the threaded finish goes towards the entrance, or journal nicely, of the receiver). Discover the tiny machine screw and wind it in with a 1/16″ Allen wrench. Take the set off guard roll pin and align the rear of the guard with the holes and use the roll pin starter punch to get it in place and end with a mallet and punch. Ensure the underside of the rear set off guard tangs are supported!! Use the sting of a piece bench or block of wooden. In any other case you danger breaking the receiver.
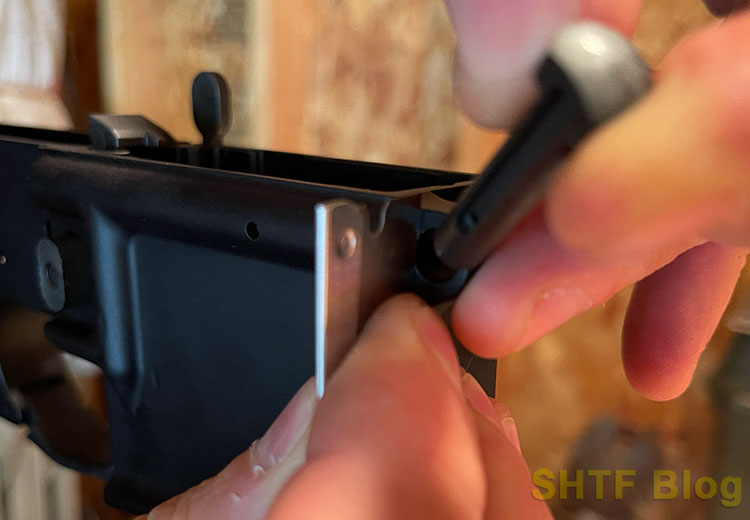
6) Time to place the decrease bench block in a vise (elective however advisable) and the decrease receiver securely on the block for the entrance takedown pin meeting (additionally known as the pivot pin). Word that in your LPK you have got two an identical lengthy, skinny springs and two an identical small brass detents. You’ll want one among every for this step.
Insert the spring into the opening on the entrance of the receiver, above and ahead of the magwell on the proper facet. the detent sits on prime of the spring, within the gap. When you didn’t get the meeting device, you should use a single edge razor blade to push the detent in and maintain it flush as you push the entrance takedown pin in place from the proper. A pair of needle nostril pliers can show useful to put the detent on prime of the spring if wanted as you push the spring and detent in place to carry it with the razor blade.
BE CAREFUL AND WEAR EYE PROTECTION! That is the meeting step that often finally ends up with launched supersonic detents and comes. As soon as the entrance takedown pin is inserted correctly (with the slot going through the again so the detent can trip in it), it ought to facet forwards and backwards with stress, and never fall out.
7) Onto the rear of the receiver! Slide the rear takedown pin in place, once more from proper to left. Ensure the slot within the pin is going through backward. Drop the opposite an identical small detent into the again gap of the receiver and the spring following it to push the detent absolutely ahead towards the takedown pin. Word that the detent all the time rides within the slots of the takedown pins, in case you’re confused in regards to the spring/detent meeting order. Take the spring out in the interim – you’ll see it protrudes from the rear of the receiver – it may be a hindrance or get damaged on the subsequent steps.
8) Take your buffer tube (technically referred to as the receiver extension) and spin the fortress nut on it with the big notches going through the again (unthreaded finish) of the buffer tube. Slide the backing plate in place; the decrease portion of the backing plate has a small stamped “bump” on it. This bump must go in direction of the receiver; it indexes right into a recess on the decrease receiver that locks it into its right orientation.
As soon as the fortress however and backing plate are put in on the buffer tube and way back to they will go on the threads, go forward and screw the buffer tube into the again of the decrease receiver. As soon as the buffer tube is began, insert the buffer retainer spring and buffer retaining pin into the opening within the buffer tube threads. Push down on the buffer retainer spring and pin, and proceed to spin the buffer tube into the decrease receiver. Screw it in till the buffer tube simply touches the sting of the retailer pin; that is its right seating depth. (see image under for reference.)

As soon as the right seating depth is ascertained, unscrew the buffer tube about 1/4 flip, or simply sufficient to show the opening in the back of the receiver for the rear takedown detent spring (cautious you don’t launch the buffer retaining pin! I prefer to maintain a thumb over it). Insert the spring, fastidiously screw the buffer tube again in to its right seating depth once more and seize the buffer retaining pin. Taking care to not crush or kink the takedown pun detent spring, push the backing plate all the best way ahead towards the receiver, capturing the spring. Holding the backing plate aligned, screw the fortress nut down tight towards the backing plate.
There’s a torque spec for the fortress nut (50 to 58 inch kilos, if reminiscence serves), however truthfully I be sure that it’s tight towards the backing plate, then I comfortable it barely utilizing my Magpul armorer’s wrench, taking nice care to not go TOO tight, as you possibly can strip threads simply.
9) Time for the grip. Invert the decrease receiver meeting on the decrease vise block, so the magwell is going through up. Place your security into the receiver from the left facet. The protection detent is barely bigger than the takedown pin detents, with one flat finish and one barely pointed finish. Drop the security detent into its gap on the underside of the receiver, pointed finish first, in direction of the security. The protection detent spring goes into its gap on the highest of the grip. Slide the grip onto the decrease receiver – taking care the the security detent spring goes down into the detent gap on the receiver) and screw the grip to the receiver utilizing the provided screw (often a big flathead screwdriver and/or an extended 3/16″ allen wrench is required). Ensure the screw is comfortable – once more, there’s a hazard or stripping threads if the grip screw is overtightened.
10) Final step (at this stage). Push the buffer and buffer spring into place. Simply drive it residence into the buffer tube, spring finish first. The huge flat finish of the buffer ought to be uncovered, held in place by the buffer retaining pin.
You now have an assembled decrease minus the fireplace management group (FCG).
Set off Meeting Steps
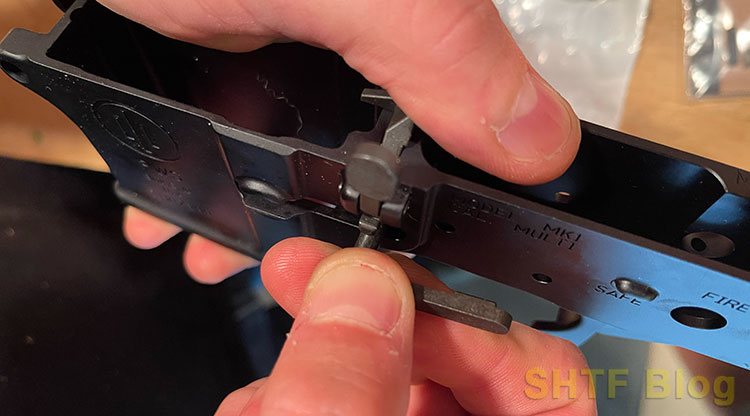
1) To assemble a mil-spec set off meeting: Assemble the springs onto the hammer and set off within the right orientation. Use the image under to notice the proper orientation of the hammer and set off springs. Push the huge finish (it’s tapered) of the spherical disconnector spring into the highest of the set off.

2) Drop the set off into the receiver from the highest, and fish it across the security lever; I discover that simply getting the set off protruding from its slot within the receiver and utilizing it to wiggle it round helps immensely; often holding it degree works finest. As you get it situated correctly, push it down from the highest towards spring stress. Look by means of the set off pin gap within the facet of the receiver and get the set off aligned to its correct location.
Begin the set off pin (the hammer and set off pins are an identical, BTW) in from one facet, and push it by means of the facet of the receiver, however not right through! Watch from the highest, and whenever you see the pin begin to transfer by means of the disconnector slot, again it off only a contact – we’re utilizing the set off pin to carry the set off considerably in place for the subsequent step.
3) Drop the disconnector into the slot on the set off, utilizing the photograph above as an orientation reference; word the notch within the disconnector sits over the coil spring you pushed into the highest of the set off. Push down on the disconnector, and as soon as it’s aligned correctly, calmly faucet the set off pin right through the set off, disconnector, different facet of the set off, then receiver. In case you are forcing it, it’s definitely not aligned. Tip: use a punch inserted from the opposite facet of the receiver to maintain issues aligned as you push the set off pin by means of. Having the security within the “off” place helps as nicely.
4) Insert the journal launch into the left facet of the receiver, insert the journal launch spring on the other finish across the threaded shaft of journal launch with a drop of oil.
5) Set up the hammer. The 2 “legs” of the hammer spring must be rotated backwards, to set on prime of the set off pin as you push the hammer in direction of. The 2 spring legs will relaxation on prime of the set off pin; one of many spring legs ought to sit in a small notch on the set off pin; this helps maintain the pin locked in place.
Maintain pushing the hammer ahead towards the spring stress, till it’s within the correct location on the entrance of the receiver. utilizing a punch as a slave pin, maintain the hammer in its correct location and push the hammer pin in from the other facet, displacing the slave pin as you go. As soon as the pin is put in (once more – don’t power it!) I’ll often put a pair drops of oil on each the hammer and set off pins to assist meeting and guarantee these high-use, high-friction factors have sufficient lubrication.
Drop-in Set off Meeting
This can be a costlier, however simpler and simpler system to put in. A drop-in set off set encapsulates your complete fireplace management group in a single piece: the hammer, disconnector, set off, and related springs are all contained in a single easy-to-install module.
To put in a drop-in set off, you’ll want the identical hammer and set off pins used within the Milspec set off set up above, however the different elements will not be utilized. Merely drop the set off module into the decrease receiver within the cavity the place the usual FCG would go, align the pin holes, and set up the pins. That’s it. Go take pleasure in a beer.
Time for the Inventory
Within the case of the Magpul CTR inventory like we now have right here, you want pull down the discharge latch to get it into place over the buffer tube. You might need to combat the discharge latch pin, however a mighty tug downwards will get the clearance essential so that you can slide the inventory on over the buffer tube.
Staking the Fortress Nut
An usually missed however crucial a part of assembling your decrease is staking the fortress nut. It’s a easy course of; merely take a hardened middle punch, and use it to create a dimple on the sting of the backing plate, driving steel into the smaller notches on the fortress nut. You don’t must go too wild right here; simply transferring a little bit of steel will make sure the fortress nut stays locked in place.
To take away the fortress nut, a correct device just like the Magpul Armorer’s wrench will provide help to spin the fortress nut off previous the stakes if wanted.


Equipment
Even with a fantastic rifle platform, you continue to want a pair equipment to maximise the potential of the package deal. For a superb throughout rifle, you don’t must go too nuts, although. Right here’s what we’re including to our PWI rifle constructed from Optics Planet orders.
Illumination
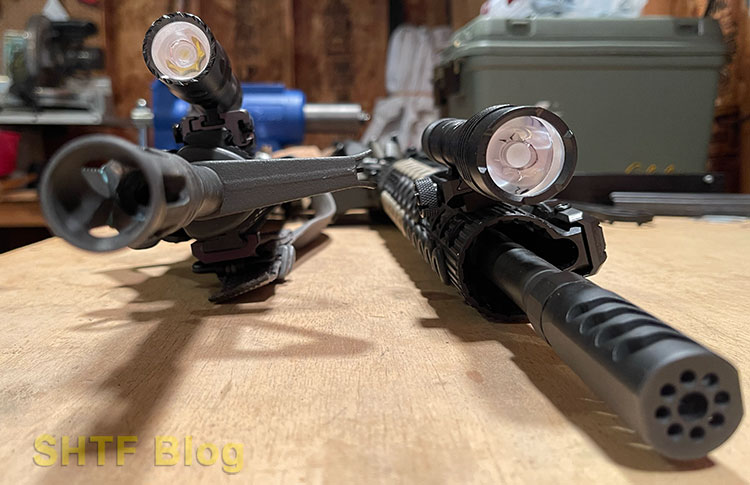
rifle wants a superb gentle. Whereas we’ve reviewed some rifle lights from Olight just like the Odin proven on the underside of the photograph under, we’re going to be popping on a Streamlight Rail Mount 2 like the highest unit within the photograph. Streamlight’s customer support is with out peer, and the standard and ruggedness of their merchandise prime notch. The Streamlight Protac Rail Mount 2 gives a well-sorted 625 lumens, a stress swap, and a stout picatinny rail mounting system.
Sling
A nicely arrange sling is an absolute should for a rifle that’s designed for critical responsibility. Blue Pressure Gear’s Vickers sling strike the perfect stability we’ve discovered between pockets friendliness, high quality, and dependability. Get you a pair push-button QD sling swivels and an MLOK QD port to mount on the handguard and also you’re in enterprise.
Sighting
You’ll want to goal your rifle, proper? Opposite to the sightless surprise ARs proven blasting baddies in “The Strolling Useless”, we’d like a component of precision in our lives. So, we referred to as upon a few the mightiest moguls within the sighting business to assist us hit what we’re aiming at: Magpul and Aimpoint.
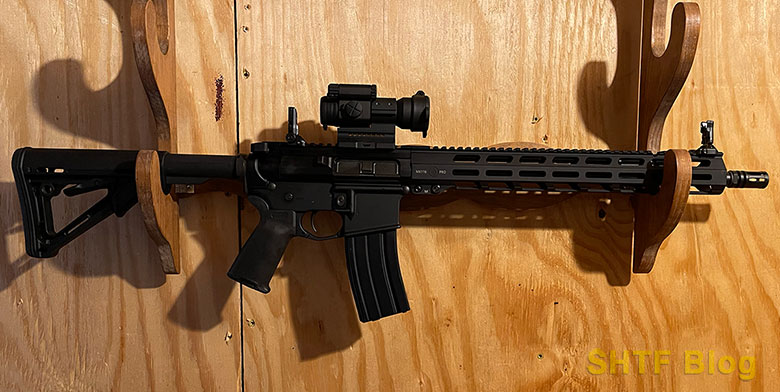
We sourced the wonderful entrance and rear Magpul MBUS Professional folding sights as a backup to our main sighting ingredient, an Aimpoint PRO crimson dot. Although we even have an Eotec 512 holographic sight obtainable, we selected the Aimpoint’s far superior battery life and smaller, extra exact aiming dot for this rifle.
Abstract
Constructing your personal AR is extremely rewarding; assembling a the purposeful rifle you wished from a pile of elements in blister packs in all fairness straightforward and personally satisfying. There are myriad ranges of efficiency obtainable for nearly actually EVERY PART on an AR-15; you possibly can construct the rifle on a budget and improve as your finances permits – or you possibly can throw down on bucks-up elements and construct a dynamite rig positive to impress vary buddies and post-apocalyptic zombies with equal aplomb. The top rifle proven right here is someplace in the midst of these extremes, however the cash was spent the place it counted to make the rifle a degree of delight and utility for us.
When you haven’t constructed your personal private AR-15, what’s stopping you? When you finances permits, choosing elements and rolling your personal AR is essentially the most wallet-friendly method to get a rifle particularly designed to accommodate your wants and perceived makes use of. So get on the market, purchase a superb high quality decrease receiver, and begin jamming elements on it; in in the present day’s oversaturated AR market, there may be actually no higher time to purchase than now and no higher elements choice than from the parents at Optics Planet.
This AR turned out as an ideal manifestation of what I used to be on the lookout for. There are lots of on the market prefer it, however this one is mine!