


This text explains how I constructed my outside cooking hearth pit. There are just about countless designs that you could provide you with in the event you’re additionally trying to construct your personal. You’re restricted solely by your creativeness.
I needed to start out cooking with open hearth as a result of 1) I like enjoying with hearth, 2) it’s extra of a problem than a grill, 3) it’s one thing I can do whereas tenting, and 4) as a prepper, the flexibility to cook dinner meals over an open hearth provides me choices. If the grid goes down and the mushroom cloud goes up, I can cook dinner total meals with nothing greater than some dry wooden and a match!
I got here up with my very own open hearth cook dinner station design as a result of I couldn’t discover one which met my wants. I needed a giant and versatile cook dinner station. I needed the flexibility to have totally different fires to cook dinner totally different meals in several methods, and large enough sufficient to entertain friends.
The good factor about my design is that you could observe it for a basic how-to and adapt it to suit your wants, area, or finances. Not that this hearth pits prices that a lot when in comparison with business outside cooking hearth pits. In actual fact, contemplating its dimension and flexibility, it’s a lot inexpensive than something you may purchase on-line or at a retailer!
The opposite benefit of this outside cooking system is that it may be simply disassembled, very like the dry match concrete block hearth pit beneath it. It’s all simply screwed collectively.
The right way to Construct My Out of doors Cooking Hearth Pit
1 – Construct a Concrete Block Hearth Pit
I constructed the body of the pit from dry stacked concrete blocks. If in case you have not learn my article on methods to construct a concrete block hearth pit, begin there as this text focuses on increasing that fireside pit to show it right into a cooking hearth pit. I clarify in that article how modular this hearth pit it, I am going into the professionals and cons, prices, and many others.
Should you resolve you don’t need a concrete block hearth pit, or you have already got an present hearth pit of another sort, you’ll be able to nonetheless learn on to learn the way I created a system for hanging cooking grates, Dutch ovens, and many others. over the hearth with the flexibility to maneuver them up or down to regulate the warmth as wanted.
2 – Collect the Cooking System Supplies
After getting a fireplace pit, you’re set to construct the construction for an over-the-fire cooking system. If in case you have any familiarity with cooking over an open hearth you recognize that after getting hearth constructing fundamentals down and know methods to management a fireplace and create the coals you want for cooking, all that’s actually wanted is a option to management the grate, pot, or pan’s distance from the warmth.
The ever present Dutch oven tripod is an instance of this. I’ve considered one of these along with the system I’ve construct as a result of it’s moveable. I can use it over a campfire anyway. I’ve even used it when cooking over my Solo Range. I purchased the Lodge “tall boy” tripod on-line at Cabela’s, however they’re additionally accessible on Amazon.
This outside cooking hearth pit system takes the idea of the tripod and injects it with steroids. The tripod is an exceptionally sturdy geometrical form. It will possibly bear quite a lot of weight. I compensate for that in my design by beefing it up.
Fairly than 3 metal rods to kind a tripod, I constructed a rack out of 1 1/4″ galvanized metal piping. This can be a system that permits me to hold a number of grates, Dutch ovens, or anything from it by way of metal O-rings, hooks, carabiners, chains, and many others. I can transfer them up/down or left/proper. I’ve choices!
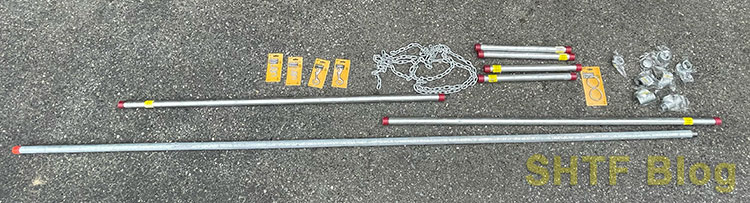
The centerpiece of this method is the ten′ lengthy pipe that stretches throughout the complete size of the hearth pit. It’s supported on either side by 5′ pipes that kind the legs. These legs are then supported by two 18″ pipes every, making a 36″ foot on the backside of every 5′ leg. I bought every thing at Residence Depot.
There are totally different size pipes accessible and you’ll even get pipes threaded to a customized dimension. You may also save a bit of cash by skipping galvanized piping, however the place mine sits exterior all yr lengthy, I spent the small quantity extra and opted for galvanized.
All the supplies and prices at time of buy are listed under:
| Product | Price | Amount | Whole Price |
|---|---|---|---|
| 10′ Pipe | $40.21 | 1 | $40.21 |
| 5′ Pipe | $26.16 | 2 | $52.32 |
| 18″ Pipe | $20.31 | 4 | $81.24 |
| 1″ Pipe Cap | $4.32 | 4 | $17.28 |
| 1″ Pipe Elbow | $4.70 | 2 | $9.58 |
| 1″ Pipe Tee | $6.30 | 2 | $12.60 |
| 3/16″ Chain | $2.17 per foot | 15′ | $32.55 |
| S Hooks (2 pack) | $3.17 | 4 | $12.68 |
| Bolt Snap | $3.97 | 2 | $7.94 |
| 2″ O Ring (2 pack) | $3.37 | 2 | $6.74 |
| Whole Price | $273.14 |

3 – Assemble the Metal Pipes
I didn’t need to have any pipes threaded as I used to be in a position to work solely with commonplace sizes. This made shopping for the items quick and straightforward. Assembling them requires a little bit of thought, nevertheless. The “rack” will get cumbersome quick. If assemble out of order you’ll be taking it aside once more. Fortuitously it’s all simply screwed collectively, so disassembly isn’t a giant deal.

Observe these steps:
- Begin by laying every thing out on the bottom.
- Slide your whole O-rings onto the ten′ pipe.
- Connect one 45-degree elbow to every finish of the ten′ pipe.
- Connect one 5′ pipe to every finish, screwed into the 45-degree elbow.
- Connect on pipe T into every finish of the leg to construct out the footing.
- Connect one 18″ pipe into one another finish of the T pipe on every leg.
- Screw the 4 finish caps on all open ends of the construction’s toes.
- Stand into place over your hearth pit.
4 – Measure and Minimize the Chains
You’re now prepared for attachment factors. Hook any latches, carabiners, or S hooks over the O-rings you might have in place on the highest bar. Now take your lengthy size of chain and decide your first lower.
In my case, this was for hanging a Dutch over. No tape measure wanted! I set a couple of logs/stick into the pit to determine the utmost size I might need the Dutch oven to succeed in. I held the deal with up and set it in opposition to the size of chain. That hyperlink is the one I wanted to chop.

I lower my galvanized chain with a bolt cutter. Should you don’t have a bolt cutter a less expensive (however extra time consuming) methodology is a hacksaw. Alternatively, you’ll be able to work out your lengths prematurely and have ironmongery shop employees lower them for you prematurely as chain is offered by the size (often) and lower to size within the retailer.
Subsequent up was slicing 3 smaller lengths of chain to accommodate my metal grilling grate. I wanted 3 small lengths of chain to connect to every level of the grate after which come collectively on the prime and hook up with an extended size of chain that may maintain the complete grate and be used to maneuver it up/down.
On this case I simply hooked an S hook into the grate and hooked up it to the chain. I then pulled the chain taught at a roughly 45-degree angle to the place it hovered over the middle level of the grate. I marked that hyperlink because the one I wanted to chop. I feel lower 2 extra lengths to the identical dimension and these have been my 3 chains that help the cooking grate.

I feel repeated the method I did with the Dutch oven with the grilling grate to find out how lengthy I wanted to chop the chain that may hand all the way down to help the three chains of the grate. Straightforward.
At this level within the course of I assumed I used to be just about finished. It wasn’t till I began utilizing every thing for cooking that I spotted one other step was wanted…
5 – Crimp the S Hooks
The issue was after I began shifting the grilling grate and Dutch oven round connections felt just a little… unsure. I needed to keep up the flexibility and have the ability to join/disconnect every thing as wanted however I additionally needed to know that every thing was safe. I made a decision to crimp a few of the S hooks to make sure chains can be much less apt to by chance disconnect.

I crimped all S hooks that I knew wouldn’t be moved from the chain. In different phrases, if I didn’t have to hook/dehook something from it, I crimped it. This imply crimping the S hooks hooked up to the three chains on the grilling grate (I additionally might have crimped them to the grate if I actually needed to). I additionally crimped one finish of every S hook hooked up to the two chains descending from the highest bar. When finished I might unhook the grate or the Dutch oven from the S hook however not the S hook from the chain.
Take pleasure in Open Hearth Cooking
You’re now able to cook dinner!
I can’t underestimate how essential the concrete block hearth pit design was to this outside cooking hearth pit. The reality is I designed the 2 to perform collectively. The cook dinner station characteristic was not an afterthought. Each the hearth pit and the cook dinner station are modular. I can adapt them to suit my wants of the day. I can simply increase or contract the complete factor with a couple of extra (or fewer) items.

You should use this setup to make two fires, one hearth with a concrete block cooking desk, and many others. You may dangle a number of Dutch ovens off it, brew espresso, grill steaks, and many others. You may even resolve to forgo the cooking setup total and delve into the world of soiled cooking!
This design capabilities equally effectively as a easy hearth pit within the occasion you need nothing greater than to observe flames dance and wooden burn to ash.

Should you’re utilizing this hearth pit to cook dinner meals, I might recommend burning solely natural supplies. No painted wooden, no strain handled wooden, and no rubbish. That is your cooking hearth pit, not a trash incinerator. You’re cooking meals right here. Hold the area clear. You’ll be glad you probably did.
Others’ Concrete Block Out of doors Cooking Designs
Conduct a fast scan of the web for “concrete block outside cooking firepit” (or one thing comparable) and also you’ll discover designs others have made. Doing that’s what impressed my very own design. Mix components of my design with others’ if that works finest for you.


Additional Studying
Constructing an out of doors cook dinner station is basically only the start of outside cooking. There’s a giant studying curve that comes with cooking over a fireplace. It’s not as simple as setting a temp and timer on an oven or gasoline grill. It’s a talent that has largely been forgotten, however as soon as you start to make progress you’re understand how enjoyable it’s and the way it provides a complete different layer to barbecuing and cooking normally.
For the prepper, outside cooking additionally provides a degree of self-reliance and private preparedness. You might be now not depending on electrical energy or gasoline to cook dinner a meal. All you want is dry wooden and a fireplace.
That can assist you get began I might advocate these three books: Meals by Hearth, Cooking with Hearth, and Dutch Oven Cookbook.
Ideas? Feedback? Ideas? Tell us what you’ve finished for outside cooking within the feedback part.